Wednesday, August 6, 2014

DIY Umbrella Drink Wreath


OK, so I should have posted this at the beginning of summer, but hey: better late than never!
I love this fun and super easy little wreath AND I got all the supplies at the dollar store!  It's bright, unique and did I mention easy?!  I think it only took me 10 minutes to put together which included stopping eleventy-billion times to get something for my kiddos. By the way: is it time for school yet?!

Ready? Let's go. You will need:

-1 Pool noodle or foam wreath form
- Tape
- Ribbon
- 3 boxes of umbrella toothpicks


1. If you're using a pool noodle follow this step, other wise skip to step 2. Trim about a foot off your pool noodle and securely tape the ends together, pictured below.  Don't be afraid to use a ton of tape!


2. Tie some ribbon on to the end.  This will mark the top and will be used to hang from your door.


3. Insert umbrellas! You will most likely not use all 3 boxes of umbrellas, however you will need them to make sure you have a good variety of color. Layer your umbrellas as you go around, making sure not to show any of the foam ring, but leave the back flat.


Viola!  See? Cheep and easy doesn't always mean skeezy! Ha! I'm too funny.


HAPPY CRAFTING!

Sunday, July 20, 2014

DIY Pallet Map of the USA!


I've been dying to try a pallet project for months ever since I saw this cool USA art piece from World Market.  The thing was so cool but $90?!  No. Freakin'. Way.  
I could SO make that.
And I did, but OH MY!  Warning for all you pallet project newbies: no one tells you how hard it is to disassemble a pallet!

But it's absolutely worth it.

Ready? Go change into work-out gear and LET'S GO! 


You will need:
- 1 Wooden Pallet, disassembled
- Handsaw (as pictured above) 
- Crow bar or an electric Sawzall (recommended!)
- 3/4-inch nails
- 2 Large mounting brackets
- Hammer
- Medium grade sandpaper
- Paint (of your choice)
- Solid Paint Stick/Pen
- 1 Spray can clear matte enamel
- 1/4-inch x 2-foot poplar wood strips (from Lowe's)
- THIS United States template

1. Print, cut out and assemble the United States template.

2. Disassemble the pallet!  I'm so sorry I don't have any pictures of this process but it was an effort of trial and error & I completely forgot to take pictures! You have 2 options:

a. Use a hammer and crowbar.  Wedge the crowbar between the top boards and the support boards to separate the nails. This is HARD but you get to keep the pretty nail holes.

b. Cut that sucker with a Sawzall! After SEVERAL hours of pulling apart pallets with a crowbar, my wonderful friend brought over her hubby's Sawzall. O.M.G. Time and back saver! Run the Sawzall between the top and support boards, evenly cutting the nails that hold it all together.  Best part, you get to keep the rusty nail heads!

Ok, now that you have your pallet boards, we may continue.

3. Select your size!  For this project, the entire thing is 3-feet by 2-feet...ish. At this point you'll also select which boards you want facing forwards.

4. Nail it together. Flip everything over and align as evenly (or not evenly!) as possible. Take your 2' x 1/2" poplar wood boards and nail it to the back, see photo below.


5. Put on hard wear. Nail in a top support brace and mounting brackets.  The top support brace is just one poplar board cut in half (use the hand saw). 
When putting on the brackets measure out the space between studs on the wall in which you intend to hang it (you will need a stud-finder). Building codes require studs be between 16" to 24" apart, so every house is different and you have to measure! 
This sucker is HEAVY so you have to mount it into studs and not straight drywall. It's also why I chose brackets instead of wire: because it's so heavy, having 2 brackets distributes the weight evenly on the nails in the wall.


6. Sand.  Flip it back over and look! So pretty! Using your medium grade sandpaper, lightly sand off the rough surface and round off all the edges. Make sure not to sand so much that you get rid of all the cool natural distressed look.


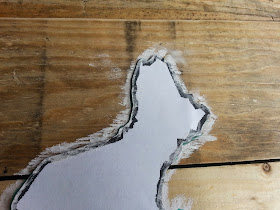
7. Trace out the USA. Lay out the USA stencil over you pallet. Using a pencil or chalk, trace out America, see next 2 photos.

Stencil centered over the pallet.
Chalk outlining the USA template.  I actually found pencil
to be easier the second time I did this.
 8. Paint. You can either paint inside the stencil like I did, our outside. Up to you, either would look cool.

9. Outline.  Using your Solid Paint Pen (an amazing accidental discovery by the way!), outline the entire painted America. This covers up the pencil outline AND the dehydrated paint pen looks like chalk, but it's permanent!


10. Clear coat it.  Spray on a couple coats of clear, matte enamel.  This doesn't make it smooth, it just locks the paint in place.


VIOLA! You did it!  
You are hot and sweaty but you made some freakin' cool art!

You can make them in different colors:

AND this same process can be made for ALL sized projects like these:


Happy Crafting!

Tuesday, July 1, 2014

DIY 4th of July Flag Wreath


Happy 4th of July my fellow Americans!

A time for grand displays of patriotism more than any other day of the year.  This means flags, fireworks and food: 3 things Americans do BIG...except for this wreath!  Instead of giant flags this beauty is covered in dozens of little flags.  Hey, when you can't go big, go for a lot right?!

Let's Go!
You will need:

-Wreath form (or pool noodle with ends connected)
- 2 packages of toothpick flags
- 1 package toothpick stars (optional)
-Star Garland
- Tulle (red or blue)
-2 small American Flags

**I got the toothpick flags and stars in the party section of Hobby Lobby!**

1. Wrap the entire wreath form in the tulle. 

Keep wrapping until most of the white is gone.

3. Wrap the star garland in the same manner as the tulle.

4. Insert flags! Start from the outside and work your way in, creating an outer ring and then 3 more inner rings for a total of 4 overlapping rings of flags.


5. Insert stars! I put a set of red/white/blue stars at the top, bottom and both sides but you can put them all the way around if you have enough!

6. Place Small flags on the wreath.  I put mine off-center to the left, but you may place them where ever you find to be aesthetically pleasing.  To attach them I simply wedged them under the garland wire!

Ta-Da!  A patriotic masterpiece to display proudly on your front door!

Happy Crafting and...


Saturday, June 21, 2014

Toddler Busy Book!

I love my children.  However, after a long car ride or road trip I don't always like them.  Like all mom's I racked my brain with how to keep my children occupied with the 3 hour drive to our beach-trip weekend.  3 hours to get to the beach, by the way?!  Are you freakin' kidding me?  *sigh* I adore the beach so I'll put on my big girl panties, stuff my family in the car with an epic ton of gear and what-nots and GO.
But how to keep the children entertained?!
TWO WAYS:

A. Prizes.  Every mommy/daddy determined "check point" I reach into a bag and pull out a new toy (from the Dollar Store!) for each kids.  Play, be happy and BE QUIET.

B. Make a busy book! A busy book is a unique way to engage your child's problem solving and fine-motor skills. I had some time on my hands this week and whipped up this bad boy with some scrap fabric I had laying around, and a quick trip to the dollar and craft stores.


Now a detailed tutorial for this busy book would be ridiculously long.  Fortunately, I think you all are pretty smart and if I give you some pictures and lists of items needed you should be able to figure it out!

The Cover: You can make the whole thing out of felt, but I had extra chevron pink fabric and had to use it.  Front fabric, lining, back fabric and ribbon.  Sew in a square inside-out, fold right-side out, sew shut. Repeat for back.
If making the whole thing out of felt, simply sew all of the felt sheets together along one side!

Buckle Page: plastic buckles, 1 sheet of felt, scrap felt for sewing on buckles. The buckles engage both problem solving and fine-motor skills.

Calculator Page: What kid doesn't love a calculator? 1 sheet of felt, calculator, scrap fabric to sew on a pocket.

Zipper/Money Page:  The point of this page was for zipper manipulation.  You can put anything you want in the zipper pocket, OR you can sew/glue in a kids wallet that has Velcro/zippers and play money!

Shoe Lace Page: Key rings, a shoe lace, 1 sheet of felt, scrap felt to make a pocket (to hold the shoe lace) and to attach the key rings. This engages fine motor skills by weaving the shoe lace through the key rings.

Alphabet Sorting Page: 1 sheet of felt, 1 key ring, ribbon, alphabet letters and scrap felt to make pockets for the letters.  I attached ribbon to these cheap letter magnets so they wouldn't get lost in the car. You're child kind sort the right letters to their matching pockets!

Shape Page: 1 sheet of felt, velcro, and scrap felt.  I sewed on the rough side of pieces of velcro to the back of the shapes.  You don't need the soft side because the rough side will stick just fine to the felt!  

What I love the most about making a busy book specifically for my kiddos is that I can custom design it to my child's interests.  PLUS it makes me feel like a really good mom because I'm engaging important life skills within my child through play learning!

Happy Crafting!

Tuesday, May 27, 2014

DIY Neon Statement Necklace


I've used my time off from school wisely as of late and indulged in some of my favorite activities: cooking and crafting....and surfing Pinterest.  I ADORE two new trends I've seen floating around the old interwebs: neon and statement necklaces.  SO I've concocted some creatively cute and bright statement pieces to set off any outfit.   
BEHOLD: Neon Statement Necklaces!

I've been pondering this craft for quite some time and I had the opportunity to bring my idea to fruition through my local MOPS group for our end of the year craft.  ALL of the moms adored the various color choices of ribbon and flowers.  I used pearls here, but you can use any kind of long style necklaces like chains or beads to create your own personal statement to display proudly along your neckline.  
Best part? The embellishments are interchangeable! The options are endless here people so let's get your creative-y-ness on!

Oh did I mention each necklace only costs about $3???  SWEET!

You will need:

- 3/4-inch Ribbon (ribbed or satin)
- 1 yard Bead or chain style necklace
- Bows or flowers 
- Alligator clips 
- Scissors
- Hot Glue
- Measuring tape
- Lighter
___________________________________________________

1. Embellishment:  Simply hot-glue the top of the alligator clip to the back of the embellishment: set aside. I needed to make these in bulk so I found these three-pack of flowers from the scrap-book section of the craft store: brilliant! You can also check out the hair-bow section and find a variety of flower and bow clips already done!


2. Beads: If you can't find a long string of inexpensive beads/chain, check out the wedding section like I did and grab a pack of pearl garland.  Each pack makes 8 strands when you cut them at 1 yard each. The ribbon section also has some awesome chain options!

*If making your own chain/strand, cut to one yard and hot glue two beads together (see below). Let dry completely and set aside.


3. Ribbon: Choose your ribbon color, cut two individual yards.  At ribbon end, cut to desired shape (see below) and quickly run the lighter over the end.  This melts the ends and prevents fraying. 


 4. Put it together! Fold the pearls in half.  On each side loop your ribbon through the pearls to connect them together (photo A).  Then tie a loop knot towards the top of the ribbon (photo B).  This keeps everything in place, and tying the knot high hides it at the back of your neck when worn. 

Photo A
Photo B
5. Embellish! Simply clip on your bow/flower/brooch/whatever to one side and Viola! 


Above you'll see the pearls and flower one, but also a chain one I made using a string of chain from the ribbon department and a small hair-bow: ALL INTERCHANGEABLE!  Have girls? Swap your embellishments out with your girl's hair-bows! THE POSSIBILITIES ARE ENDLESS!!

I even had one friend make a red white and blue one (white pearls, red ribbon and blue flower) to show her patriotism, how versatile! 

Each necklace costs about $3-$5 depending on the materials you use!

Happy Crafting!

Thursday, May 1, 2014

DIY Coasters!

The objective of the crafts I share with you is to show two things: 
1. That pretty things don't have to be expensive, and 
2. You don't have to consider yourself "crafty" to do them!
If you don't think you are a crafty person, fear not!  I have a craft for you!


That's, right coasters. No longer must your coasters be lame and cardboard!
Let's get started,
You will need:

- Felt
- Scrapbook paper
- 4x4 White Tile
- Paintbrush
- Hot glue and hot glue gun
- 50/50 glue water mix (or Modpodge)
-Spray enamel (I prefer Rust-Oleum)


1. Cut out your pieces.  Place the tile on top of the felt, trace and cut out, set aside.

2. Place your tile on top of your paper and cut your paper slightly smaller (about 1/8th inch) than the tile, set aside.

3. Hot glue the felt to the bottom of the tile.  Be generous especially around the edges so it doesn't come off!


4. Using your 50/50 glue-water mix (or Modpodge), brush on a sparingly thin layer of glue-mix to the top of the tile, place your paper on top of the glue and adjust to fit. Then put another sparingly thin layer of glue-mix to the entire top.

Let dry (about 5 minutes).


5. Take your tile OUTSIDE and spray a coat of enamel on.  Apply multiple coats if you feel it's necessary, I put on two coats and it gave my coasters a nice glossy and WATERPROOF finish! 

Here are a bunch of coasters I had my MOPS group do on a craft day! Such creative ladies!
The options are endless for this craft!
You could use paper-printed photos, napkins and even fabric!
They could easily be made into personalized gifts for family and friends or simply something fun for yourself to spice up your beverage time!

Enjoy, and Happy Crafting!

Wednesday, April 9, 2014

Spring Bling! DIY Convertible Necklaces!


I am a necklace whor-...uh... hoarder
I don't collect much and don't like clutter (obviously), but when you're mostly a jeans and t-shirt girl like me, well, a little bling goes a long way!
HOWEVER, I don't like to spend a lot of money on my accessories and I had a brilliant idea!
Convertible necklaces pendents! 
One necklace chain and an endless selection of pendents! I found everything I needed at Hobby Lobby and their jewelry parts just so happened to be 50% off. Score.

Here's how to do it, you will need:
- lobster clasps
- necklace chain of your choice
-pendents
- 2 sets of pliers

1. Separate the large lobster clasp from the small connector piece, discard small piece (on left) or save for later.


2. The end of your pendent or charm should already have a ring connector attached to the end. Using both pliers separate the opening by twisting. DO NOT pull apart as it will not go back close enough again. Twisting allows the ends of the circle to stay aligned but open.


3. Slide the small circle end into the hoop and twist close.  If you have two ends (like the one below) repeat on other side.


4. You now have an interchangeable pendent piece for your necklace chain!


5. Attach to chain any way you like! This coast me no more than $3 to make and it looks fabulous! 


Enjoy making your own blingery my friends!
A fancy necklace is always a great way to dress up a t-shirt!

Don't forget to let me know what you think and if you'd like, share your creations below!

Happy Crafting!