DomestiKated {101}


With all those pieces flying around in our lives it's fun to unwind and embrace your creative self! Craft ideas, tutorials, helpful hints, tips tricks and maybe even a recipe or two will be here for you, tickled pink to tantalize your creativity!

Wife*Military-Spouse*Mom*Full-time-student*Domestic-goddess*Martha-Stewart-I'm-Coming-for-you!

Friday, November 22, 2013

DIY: Wine Cork Key-chains


  It's time to get into the holiday spirit!  So lets start with something  easy: STOCKING STUFFERS. 
Stocking stuffers are sometimes incredibly hard to find for  grown-ups. Kids are easy: candy, little toys and maybe even   socks and underwear.  But grown-ups are kinda' sick of getting   socks and underwear by this point.  So here's something quick, easy and fun: Wine Cork Key-chains!
Now this is a 2-parter because I feel that wine corks are more girly so later I'll also have a tutorial for bottle cap key-chains. 

Here's what you'll need:

Ribbon
Corks
Small eyelet hooks
Key rings

Now you can collect corks the fun way (by drinking lots of wine!) or you can just buy a bag of them at Walmart for $4 (they're in the craft isle next to the candles).

1. Screw the eyelet into the top of the cork.

2. Hook the key ring onto the eyelet.


3. Add some flare by tying on some ribbon!


Now I have seen some CUTE cork crafts on Pinterest where they paint little people onto champagne corks or what-not and you could SO do that if you're in a creative mood!

Happy stuffing!

Saturday, November 16, 2013

Today's Top Tip: Shaving with Baby Oil

I used to be a firm believer in ladies shaving cream.  
Then I realized men's shaving cream was cheaper and just as effective.  THEN I ran out of shaving cream one day and remembered something I saw on Pinterest: using  baby oil instead of shaving cream!  Why not, right?  HOLY MOLY does this option work great!


2 Reasons why shaving with baby oil is awesome: ONE, baby oil gets much closer than shaving cream so your legs are super silky smooth.  TWO, the baby oil keeps your shaver sharp for longer.  Honestly it's just a win-win!

You can even use baby oil gel which may be easier to apply.

Enjoy!

Friday, November 15, 2013

Yummy Spicy Bruschetta

          I love bruschetta. It is simple, flavorful and celebrates what Italians do best: the tomato (what you thought it was pizza and spaghetti?)!  However I am not Italian so to my true Italians out there, turn away! This may get weird!

         My recipe is based on the traditional bruschetta but with a twist...it's spicy, well spicy-ish.  Let me preface this by stating that bruschetta is served HOT, not cold. So all you American cooks out there claiming to be making bruschetta by dicing up some tomatoes and serving it on bread: you're wrong!  You made a crostini, which may be served cold or hot.

Bruschetta = HOT. Crostini = cold. Got it? Good.

If you are going to make this bruschetta it is best to plan and prep ahead of time.  Make up the tomato topping as early as the night before so all the flavors have time to marinate and get friendly with each other.  However, if you are in a bind this will still taste pretty darn good made last minute, just not as good as it could be.

Ingredients:
6 roma tomatoes
1 bunch fresh basil
1 cup shredded Parmesan 
2 tsp garlic
3-4 Tbs extra virgin olive oil
1 tsp salt
1 Tbs red pepper flakes or to taste
1 long loaf french bread

(I just heard all my Italian friends throw their hands up and scream at me in Italian)


1. Tomatoes: Slice the stem end off all your tomatoes, then quarter them length wise.  This exposes the seeds inside making it easy to gut the seeds (see picture above). Clean out the seeds and discard. Dice the rest of the tomato and place in a bowl.


2. Basil: Dice your basil roughly.  The pictures above show what I found to be the best method for chopping fresh basil: Lay your leaves flat on top of each other then roll them all up and dice them that way.

3. Add your garlic, salt, red pepper flakes, and 1/2 c. Parmesan (save the rest for later). Combine well, cover and let sit in the fridge as long as you can! 

Bruschetta topping, YUM!
4. Turn on your broiler, it should automatically go to 500*

5. Bread: Slice your bread into half-inch pieces at an extreme angle.  You want a large surface area of bread with out it being too thick. Lay them all out flat on a pan and under the broiler toast them for 2-ish minutes, flipping half way though.  Toasting the bread fortifies them as a great base for the juicy tomato mixture!

6. Put it together! Spoon on the tomato mixture onto each slice of bread then top with a little more Parmesan.  Pop those bad boys back under the broiler for a few more minutes until cheese is melted (around 2-3 minutes).

Ecco! (That's "ta-da" in Italian!)
Enjoy!

Wednesday, November 13, 2013

DIY Fall Pumpkins

   In today's society the biggest thing that marks the beginning of fall is pumpkin. Pumpkin lattes, pumpkin creamer, pumpkin pie, pumpkin bread, carved pumpkins...pumpkins pumpkins pumpkins!

PUMPKIN ALL THE THINGS!

    I am no different and love my pumpkined stuff and so I stuffed a pumpkin...a little one...a burlap one: aren't they adorable!  So easy to make that when I hosted a Mom's-Night-IN the other night we drank and made 30 of these adorable little pumpkin-doodads.  Let me tell ya', there was more pumpkin making than drinking going on: crazy right?!

Let's get started!

You will need:
 1.5 yrds & 1 ft. Hemp twine
Ribbon
6" x 12" Burlap rectangle (size doesn't have to be exact)
Cinnamon stick
Stuffing
*Optional: potpourri*
Hot-glue gun


1. Fold your burlap in half, making a square and glue the edge opposite of the fold. Be glue conservative here because of the porous burlap: you don't want to glue it down to the table! 


2. Gather one open end and tie it off real tight with the small piece of twine, leaving one string end much longer than the other.

3. Turn it it open side up, then flip it inside out (our outside in?) to create a pocket.


4. Stuff that bad boy!  The fluffier the better, don't be afraid of the fluffy.  Lead the long string that is tied to the bottom out through the middle of the stuffing
**Optional: add potpourri in the middle like bellow** 


5. Time to test your folding skills!  You're going to fold the opening closed like you were wrapping a present, but leave that long string poking out and not glued down:  
First fold in half, overlapping: glue.

Then fold the left side to the middle: glue, and then the right side overlapping the left-side fold: glue.

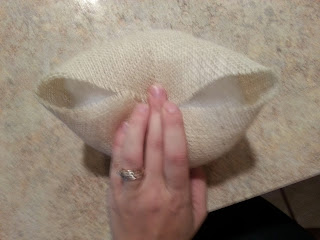
This is what it should look like glued closed: a little box shaped fluffy thing.
 6a. Ribbon skills:  Wrap your long piece of twine around your puffy package like you were wrapping ribbon around a gift-box: Lay the twine over the top, flip it over, wrap it around and twist then flip it back over, come back around and twist it on top.

6b. The you'll do the same thing again but over the corners. Tie off

This is what it should look like when all four sides and all four corners have been wrapped by twine.
 7. Remember that string that's been sticking out of the middle for a while now, here's why: Pull that string upward to squish your pumpkin together in the middle, giving it a more defined pumpkin shape and tie it off to the other strings on top (not pictured).

8. The stem: Glue the cinnamon stick to the middle of your pumpkin top over the crisscross of strings.  Do not be shy with that glue, I mean like get glue slutty and just glob it on!  The glue should come around the edges of the bottom of the cinnamon stick giving it extra vertical support.

You may have to hold onto the cinnamon stick for a minute or two while the glue dries.

9. Tie on a pretty ribbon and voila! PUMPKIN!
I tied little knots in my excess sting, but you can always curl them too by saturating them in Elmer's glue and wrapping them around a pencil till they dry...I was too impatient for that!


Happy Pumpkining everyone!

Thursday, November 7, 2013

DIY No-Sew Fall Table Runner!


     Adding to our seasonal decorating dilemma,  let's not forget the dining area!  Burlap fabric is so in right now which makes us cheap/poor/broke people very happy because it's super inexpensive.  I chose to stick with my preference of non-traditional colors that are still obviously fall. However, you may choose any burlap that you like because this cheap stuff now comes in an array of colors! So here's my tutorial for an incredibly easy and great looking addition to your festive home!


You will need:
-Hot glue gun
- 1 large piece (base) burlap, the length of your table plus 1 foot
- 1 coordinating/contrasting (top) piece of burlap, same length as above
- 2 spools of lace or ribbon

**Helpful tip: get 1 yard of your base burlap and cut it length wise into thirds. You only need 2 out of the 3 pieces for a large table like mine.  Save the extra piece for later crafts or create a mini table runner for a console table! For the coordinating top piece of burlap, most craft stores sell these colorful pieces in 6-inch wide rolls.

1.  If you used my helpful tip you have 2 base pieces that need to be attached together.  Lay them end to end on your table and overlap. Now look at the overhang and adjust that overhang to your desired length by either overlapping your burlap more or less.  Use your judgement but my ends overhang my table by 6-inches on either side.  My middle overlap is overlapped by about 3 inches.  Here's the best part: hot glue that sucker together with a quick zig-zag of glue!  *Don't use too much glue because burlap is very porous and you don't want it sticking to the solid surface underneath* 

2. Using the same hot-glue technique, glue down your coordinating burlap strip to the full length of the bottom piece 

3. Last but not least: the pretties!  Hot-glue down your ribbon/lace around the entire border of the coordinating burlap and voila! DONE!


I think this entire craft cost me around $6 and I got 2 runners our of it all! I just love adding a punch of pizzazz to my sometimes lacking dining space!

Happy crafting!

Wednesday, November 6, 2013

Dump Cake!

Something I think everyone should always have on hand in case of the need for a last minute dish are the ingredients for Dump Cake. There are a few different versions out there, but here's mine:

Apple Cinnamon Dump Cake 

It is cheap, fast and easy to do and ALWAYS tastes great!

Ingredients:

1 Box Angel Food Cake
1 Can ANY 20-22 oz. Pie filling.

Directions:

Mix both ingredients together in a bowl until well combined. Poor (more like plop!) mixture into a well greased 9 x 18 baking dish.  Bake at 350* for 30 minutes or until lightly browned on top.  

DO NOT UNDER COOK:  It's better to be a little browner and make sure it's fully cooked than have to look perfect but be under cooked.

That's it!
For this particular photographed ingredients of Apple Pie filling I topped with a little cinnamon and sugar.
I always have these ingredients on hand so that when I decide last minute to host a play date (like today!) I'm always prepared!

Enjoy!

Monday, November 4, 2013

Today's Top Tip: No towels in your hair!

So I'm a sucker for crazy brilliant tips I find on Pinterest.  HOWEVER some of those tips...well they don't really work.  Pinterest fail meme's are super hilarious but they also make us hesitate from trying any "helpful tips" we find anywhere online.  Well, you need not worry or hesitate anymore!  I have a few things I've tried out that ACTUALLY work, and being that I like you I think I'll share them.  But only once in a while, so don't get greedy!  

Let's get started: DON'T dry your hair with your towel!  Your fibrously fluffy towel frizzes up your hair leaving your mane as fluffy as your towel when it dries.  But how should you dry your hair then? With a *drum roll please*
T-SHIRT.
Finally a use for that entire drawer full of old random t-shirts!

Wet hair + towel = no frizz!
Put the t-shirt hole over your head, then flip your hair upside-down and flip the body of the t-shirt around your hair. Twist the t-shirt-hair burrito, flip it back over your head and tuck it in the back.
Towel turban! 
After your towel turban has done its job at sucking up the extra water in your locks, style as usual but this time with less frizz.
You're welcome ladies.  This Pinterest tip is not a fail!

Sunday, November 3, 2013

DIY Envelope Pillow Covers

We are at the cusp of the holiday season and we all want to start bringing a little festive feeling into our homes.  We throw ourselves into design magazines and obsess over Pinterest, trying to find those perfect holiday touches.  Well I find the easiest way to instantly spruce up a room is just by switching up the pillows.  HOWEVER, this can get pretty expensive, even at the discount stores. If you have a throw pillow obsession (as I do!) and have oh say... 10 throw pillows just on your couch...well, my wallet cries when I think about replacing all those pillows just for a few festive weeks.  How, do you ask, we approach this conundrum?  To the craft store!  I will just do it my self and sew up some easy envelope style throw pillows!

Here is my personal recipe for envelope throw pillow covers.  These covers are for 20 inch throw pillows. And yes I sew on the floor...don't judge me.

You will need:
Sewing machine
1/2 yard fabric
pins
thread of coordinating color


1. Lay out your fabric and make sure it's big enough to encase your pillow by laying your pillow on top and making sure you can see edges of fabric (about an inch) on the sides.


2. Making the exposed edge pretty:  This side will be the exposed side of the envelope, so on one short side, fold the edge over 1/2 inch two-times and pin, you're ready to sew your first side! 


3. Double check your settings: Make sure your tension is good, your thread pattern is straight and your needle is all the way to the right.


4a. Keeping the foot lined up with the edge of your fabric, sew a straight line all the way down, turn your fabric around and sew down the other side of the fold (again, lining up the foot with the edge).

See! Pretty.


4b. Now this step is optional:  for the non-exposed edge of the opening, you don't half to, but I like to repeat the same process as step 4a but with a zig-zag stitch.  For me this just firms up the "envelope" opening.  However, it's not exposed so you don't have to do this.


5. Folding it up: Lay your fabric out print side up and fold over your pretty side just over the middle first.


6. Fold over the non-exposed edge overlapping the pretty edge by a few inches (about three).


7. Make sure your shape is square:  at this point you need to double check your cover is square.  What I like to do is fold the cover into a triangle.  If all the edges mostly line up then it's square.  Above you can see it's off by about a quarter of an inch, this is fine because I'm accounting for the seam.  The finished cover will be perfectly square!


8. Pin and sew!  Pin your sides in place and sew the raw edges together on the top and the bottom (or left and right depending on how you look at it!).


9.  Another optional step:  trim your corners off.  This creates a much cleaner corner when you turn it right side out.

Inside-out view                                      Right-side-out view
This is what it will look like when you are done sewing

 TADA!  Pretty fall inspired pillow covers!

These took about 15 minutes a piece to do, but only because I was constantly interrupted by my kiddos.  Good luck and enjoy!