DomestiKated {101}


With all those pieces flying around in our lives it's fun to unwind and embrace your creative self! Craft ideas, tutorials, helpful hints, tips tricks and maybe even a recipe or two will be here for you, tickled pink to tantalize your creativity!

Wife*Military-Spouse*Mom*Full-time-student*Domestic-goddess*Martha-Stewart-I'm-Coming-for-you!

Tuesday, December 24, 2013

Sparkle Clause & the 12 Crafts of Christmas: #12, Santa's Magical Key!

Merry Christmas Everyone!  I wanted to end this marathon blogging with the piece de resistance
Santa's Magical Key!  
I've seen a couple of these on Pinterest and I adore this idea since we have continuously lived in homes with no chimney to speak of.  I loved THIS one the most because it had the best poem and so I'm totally ripping it off using it (imitation is the highest form of flattery right?!).

Here's what you'll need:

-A vintage looking key 
- Wood plaque 
- Paint pens
- Paints in Christmas colors
- Wire edged ribbon
- Paint brush
-Staples or nails


I got all my items at Hobby Lobby including the key!  Now my key and plaque are HUGE, but yours does not need to be. I just felt the large scale felt more magical!

1. Paint the plaque: I painted mine green with basic acrylic paint, however you can use spray paint too and use any color you like (or happen to have on hand like me!). Let dry.


2.  Using your paint pen write on your poem:

Dear Santa,

We have no chimney as you can see,
So please just use this magic key,
To leave the gifts under the tree!

Love,
The Williams Family


NOTE: insert your family name: how awkward would it be to put on the wrong name for Santa?!

3. Nail/Staple the ribbon to the back of the plaque so it can hang from the door knob. The ribbon shouldn't be too long, about 18 inches at most:


4. Tie the key onto one side of the hanging ribbon (below, left).  I also made my bow all fancy, but it's not necessary (bottom, right).


Now you're ready to let Santa in!

I hope you have enjoyed these crafts as much as I have,
So have yourselves a Merry little Christmas and a wondrous New Year!

Merry Crafting!


Sunday, December 22, 2013

Sparkle Clause & the 12 Crafts of Christmas: #11, Cork Drink Coasters!

Here's another last minute craft-gift idea!
I'm kinda' loving cork crafts right now, I think because I have like a bazillion of them.  But this craft makes a great gift for friends, neighbors, or anyone really!
Without further a-do, here's #12 on the craft list:

Cork Coasters!


You will need:
- 32 corks (makes 4 coasters)
-paper
-Stiff paper plate
-felt
-scissors
-hot glue gun


1. Use your piece of paper to make a square template for an accurate sized backing to your coaster.  Then cut a square out the stiff paper plate and the piece of felt using the template you just made.


2. Glue the felt to the cardboard square. 


3.Arrange your corks in your preferred pattern.  On one of my coasters I put all the logos face up!  Then glob on some hot-glue to the paper side of your square and sticking onto the middle of your cork arrangement. 


4.  Once you flip it over you may notice it's a bit wiggly, just glue between the corks and it will stabilize it.

Ta-da!  You don't even have to be a wine lover/drinker to enjoy these coasters!  If you don't have a plethora of corks on hand like I do, they are sold in unused packages in the craft section (next to the candles) at Walmart for $4-ish.

*TIP: it helps to use uniform sized corks when assembling your coaster*

Merry Crafting!


Friday, December 20, 2013

Sparkle Clause & the 12 Crafts of Christmas: #10, Bottle Cap Key-chain


We are only a few days out from Christmas and last minute gift needs are creeping into your mind! I know it's not exactly holiday-ish, but  I love these easy little stocking stuffers because they're fun and personal: just remember to save your other half's bottle caps! However I can't help you if they're can beer drinkers.  May I introduce #10 on the list:

Bottle Cap Key-chains!

Here's what you'll need:
-Bottle caps
-Key rings and hooks
-Hammer
-A fat nail and scrap wood


1. Like the cork key-chains this is SO easy. First, punch a hole in the bottle cap by nailing a hole through the top with the fat nail and hammer, using the scrap wood to not damage your other surfaces.


2. Attach key hook to cap through the hole then attach that to the key ring and THAT'S IT! Now you have a masculine complement to your feminine cork key-chain!  


Merry Crafting!

Thursday, December 19, 2013

Sparkle Clause & the 12 Crafts of Christmas: #9, Pom Pom Garland

By now your house is looking fabulous from all these crafts you've been doing...but there's more! This adorable Pom-Pom Garland is cute, durable and relatively easy to make.  Be forewarned though that this does take a bit of time, but it is so worth it, I mean come on! Look how cute this is:


Ok, let's go!
You will need:
*Yarn, 4 colors
* Twine, or hemp rope
*Super sharp scissors
*and a decent amount of time


1. To start on the pom pom, cut a 6+ inch peace of yarn and place between your fingers like so:


2. Next, take your yarn (not the peace between your fingers) and start wrapping around your fingers, don't make it too tight or you wont be able to get it off!  Wrap around as many times as you like: the more you do it, the bigger it will be!


3. When you're done wrapping your yarn, cut it off of the ball of yarn.  Then take that 6 inch piece that was sitting between your fingers and tie it really right around the middle of your small bunch of yarn.  I like to tie it tight once, take it off my fingers, then tie it tight on the other side again just for extra security.


4. This is what it should look like once it's off your hand.


5. Cut: Take your extra sharp scissors and insert along one loop side and cut all the way around: you will start to see your pom-pom form!


6. At this stake it's pretty shaggy, so you'll have to shape it. Using your best judgement, trim the long ends of yarn away until you get a ball shape, but leave the 2 middle yarn ends for later.


7. This is what it will look like once your done trimming!


8. Lastly, tie the long middle ends to your jute/hemp rope (see below) and trim off those ends to blend into the rest of the pom-pom.  I tied mine about every 5 inches.


It took me a couple hours to make all the pom-poms, but it's a mindless craft that can be done while watching TV...well, that's what I did anyway!  I love garlands, I have a few different kinds around the house to bring the Christmas spirit into my house. This pom-pom one is hands down my favorite and like most of my crafts it's pretty inexpensive and durable so we can enjoy it for many Christmas' to come!  You could also easily customize it to suit your design taste too.

Merry Crafting!

Tuesday, December 17, 2013

Sparkle Clause & the 12 Crafts of Christmas: #8, Paper Cone Trees

O.M.G. These things are TOO fun!  I love the festive pops of color these cute little trees can easily (and inexpensively) bring to your holiday decor.  You could easily make tons of these to decorate your mantel, but I don't have a mantel.  I have a shelf.  And that shelf is going to be the most festive shelf... ever!

#8 Craft, here we go:

For the Tree:
Glue Stick
Scrapbook paper
String
Pencil

Make it Fancy:
Wooden spool 
Wood dowel 
Hot Glue Gun
Glitter, Ribbon, and/or bows


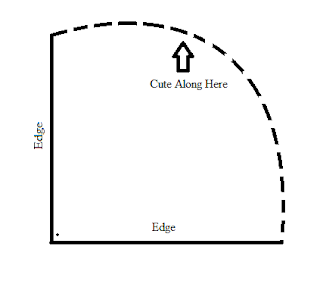
1. The template below is the tree shape we will be making.
1. Making a compass: This is to give you a nice curved shape for the bottom of the tree. Attach the sting to your pencil. Hold the free end of your sting on one corner of your paper, then extend the other end to the other corner (not the diagonal corner) until you reach your desired tree height (This one is a tall tree so I went the whole length of the paper)


2. Using your pencil end and string as a guide, draw a curve from corner to opposite diagonal corner. Cut along the curved line.


3. The sharp corner is the top of the tree and the curved side is the bottom.  Run your glue-stick along one straight side of the paper and roll the other straight side to the glue (press edges firmly together to set glue), forming a cone tree!


That's it for the tree!  But to church it up follow the rest of the directions:

4. Tree Stand:  Hot- glue the dowel into the wooden spool.  I covered mine in glitter, but you could easily paint it or leave it plain.


5. Hot glue ribbon bow toppers, add glitter or whatever pretties your heart desires to dress up your trees!  These trees are still pretty if you desire to leave them alone too!

I made different sizes from lots of different paper and placed them at different heights on stands (below) and mini cake stands I made from dollar-store candle bases and paint!


Merry Crafting!

Sunday, December 15, 2013

Sparkle Clause & the 12 Crafts of Christmas: #7, Ornament Pillow


As you've already seen from me, pillows are a great way to change the look of a room.  Christmas pillows are no different and because it's the holidays you can get a little crazy-cooky with them!  This particular pillow that I did was so easy!  It's not a cover, just a holiday pillow but minimal sewing and lots of hot glue is involved! Ornaments are not just for trees, cuddle up with them too!

You will need:

-Scrap fabric
- Ribbons
-Buttons
- Glitter puffy paint (optional)
-Hot glue gun or fabric glue
-Needle & thread, or sewing machine
- Pillow stuffing


1. Decide the size of your pillow, it can be square or rectangle, as long as you have a front and back that line up. The front of mine is linen and the back is just a solid red.

2. Cut out your scrap fabric ornament shapes. Decide where on the pillow you'd like to place them then place different lengths and colors of ribbon at their tops like pictured.  I also added little bows and buttons for extra flair!


3. Glue all the ornament and ribbon pieces down really well!  If you are so inclined (and talented) you may sew them down too, but I ain't got time for 'dat.

4. Now that your ornaments are glued down really well, place the front sides of the front and back pieces together (this means when you sew the ornaments will be on the inside).  Sew 3 sides together, but only sew a portion of the 4th side to leave an opening for the pillow stuffing. When done, flip it right-side out through the stuffing hole.


5. Stuff it, stuff it real good!  Get your inside corners first really well then fill in the rest of the inside.  You want it to feel like there may be a little too much, but once you have the hole closed, the stuffing will spread out evenly.


6. Sew it closed.  Many prefer to do this part by hand with a slip stitch, but I just tuck the raw edges in and pin like shown above.  Then use my sewing machine to close it up.  This is on the bottom of my pillow so it's not really noticeable when propped up on my sofa.


7. Lastly (and optionally) I used glitter puffy paint around all the raw edges of my ornaments to prevent fraying and to help them stick down just a little more.  Plus, it's freakin' glitter!

Ta-Da! My lovely little ornament pillow! Honestly it took almost no time at all, the hardest (and longest!) part was deciding how I wanted to arrange the ornaments!

Merry Crafting!

Saturday, December 14, 2013

Sparkle Clause & the 12 Crafts of Christmas: #6, Tip for hanging outside lights

So we're half way into the Christmas season and if you haven't hung your outside lights yet, that's ok!  I have a great solution for hanging those lights without having to spend even more money on special light clips: CLOTHES PINS!


Your house should be surrounded by gutters, if not all at least most of it.  I went to great heights (literally!) to get this next photo for you.  All you have to do is use the clothes pins to clip the lights to the inside edge of your gutter!  The best part is they make it almost invisible unlike those special light clips.


Clothes pins are cheap and most people usually have some laying around somewhere, if not go get some....like right now.

Merry Crafting...er...DIY-ing?! Whatever, enjoy!

Friday, December 13, 2013

Sparkle Clause & the 12 Crafts of Christmas: #5, Kid's Tree!


The tree is up, every ornament is in it's final place (because you know you readjusted your ornaments 100 times for perfect coverage) and it's time to enjoy your tree: WRONG!  It's time for the little ones to destroy the tree. Our tree? Everything on the bottom 2 feet is constantly being taken off by my precious little "angel". All day I'm saying "no. No. NO!" Oh boy, way to take the Christmas spirit right out of me kid.  But I had an idea!  I wouldn't say it was a solution, but it helped!

And thus, unto us a Kid's Tree was born!

Here's what I had laying around:
-Poster board
- Green fabric
-velcro
-pom pom's, plastic ornaments, stickers, art foam and scrap fabric (for kid's ornaments) 


1. Sketch out a tree on a poster board.  Pretty or messy it doesn't matter because it's all getting covered up.  Or it could be both like mine and be pretty messy!


2. Cut it out and attach a trunk from the scraps.


3. Cover with fabric: lay your tree on top of the fabric, then cut around the tree about 2 inches away from the edge. On the inside corners cut a slit all the way to the poster board, this will allow for easier covering.


4. Fold the edges around the poster board and tack down with tape or glue.


5. Flip over and attach velcro to the front of the tree, then attach velcro to random kid friendly ornaments. I had some leftover plastic ornaments and some yarn pom-poms to use.


Attach this bad-boy to a wall and viola! I bet you'll get at least 10 minutes of peace without having to scold someone for un-decorating the tree!

Merry Crafting!

Monday, December 9, 2013

Sparkle Clause & the 12 Crafts of Christmas: #4, Scrap Wood Tree

                                                                                                                                                                                                                                             Sparkle Clause here and time for #4 on the crafting list! I have seen a few of these pallet trees floating around Pinterest and I have fallen in love with them!  So, when I saw a house down the street under construction with a HUGE pile of scrap wood on the curb I pounced!  I pulled up with my little "box" of a vehicle and snagged me a few pieces (not gonna' lie, I'm going back for more).  However, this could easily be made from pallet wood too.  So I ransacked my hubby's tools (just kidding that's my stuff) and this is what I came up with!  Hopefully it's easy enough for you to do too because I feel that they're a wonderful addition to your holiday decor inside or out.

Here's what you'll need:

- Scrap wood
-Long and small nails
-Hammer
-Tape measurer
-Saw
-Ornaments
-Ribbon


1. Wood: you will need 1 long piece (trunk), and 5 consecutively smaller pieces.  My bottom "branch" was 2.5 feet and then each "branch" after that was cut 6 inches shorter than the last.

2. Angle the ends:  To give your tree a more triangular shape cut the ends off at an angle, pictured bellow.  This handy saw base gave me perfect corners each time.  However, if you have a power saw of some kind this project would go hellofa' lot faster!


3. Nail it together: Using the same 3-inch proportion as before, I started nailing at the top.  The top of my very top "branch" was 3-inches from the top of the "trunk".  Then the top of each "branch" was 3-inches from the bottom of the previous "branch".

To give the best stability, I would nail 4 nails into each "branch" in a square pattern.  You could glue the "branches" on too, but I don't think it will have the same longevity. I mixture of glue and nails is best.


4. Prep for pretties:  Nail on small nails randomly onto each "branch".  You may need to stabilize the branches with scrap wood before nailing. These little nails provide an easy place to hang ornaments from!

See that little nail? That wee-little nail?!
Lastly, customize!  I adorned my tree with a pretty custom bow made from chevron wired ribbon (from Hobby Lobby), and hung miniature ornaments from the little nails (my kiddo's helped with that part!).  But honestly you can do-it-up any way you want: paint it, vinyl letter phrases, big ornaments, stars...whatever!  It's you're tree, make it reflect you!

Merry Crafting!