PUMPKIN ALL THE THINGS!
I am no different and love my pumpkined stuff and so I stuffed a pumpkin...a little one...a burlap one: aren't they adorable! So easy to make that when I hosted a Mom's-Night-IN the other night we drank and made 30 of these adorable little pumpkin-doodads. Let me tell ya', there was more pumpkin making than drinking going on: crazy right?!
Let's get started!
You will need:
1.5 yrds & 1 ft. Hemp twine
Ribbon
6" x 12" Burlap rectangle (size doesn't have to be exact)
Cinnamon stick
Stuffing
*Optional: potpourri*
Hot-glue gun
1. Fold your burlap in half, making a square and glue the edge opposite of the fold. Be glue conservative here because of the porous burlap: you don't want to glue it down to the table!
2. Gather one open end and tie it off real tight with the small piece of twine, leaving one string end much longer than the other.
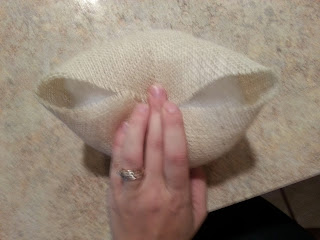
3. Turn it it open side up, then flip it inside out (our outside in?) to create a pocket.
4. Stuff that bad boy! The fluffier the better, don't be afraid of the fluffy. Lead the long string that is tied to the bottom out through the middle of the stuffing
**Optional: add potpourri in the middle like bellow**
5. Time to test your folding skills! You're going to fold the opening closed like you were wrapping a present, but leave that long string poking out and not glued down:
 |
| First fold in half, overlapping: glue. |
 |
| Then fold the left side to the middle: glue, and then the right side overlapping the left-side fold: glue. |
 |
| This is what it should look like glued closed: a little box shaped fluffy thing. |
6a. Ribbon skills: Wrap your long piece of twine around your puffy package like you were wrapping ribbon around a gift-box: Lay the twine over the top, flip it over, wrap it around and twist then flip it back over, come back around and twist it on top.
6b. The you'll do the same thing again but over the corners. Tie off
 |
| This is what it should look like when all four sides and all four corners have been wrapped by twine. |
7. Remember that string that's been sticking out of the middle for a while now, here's why: Pull that string upward to squish your pumpkin together in the middle, giving it a more defined pumpkin shape and tie it off to the other strings on top (not pictured).
8. The stem: Glue the cinnamon stick to the middle of your pumpkin top over the crisscross of strings. Do not be shy with that glue, I mean like get glue slutty and just glob it on! The glue should come around the edges of the bottom of the cinnamon stick giving it extra vertical support.
 |
| You may have to hold onto the cinnamon stick for a minute or two while the glue dries. |
9. Tie on a pretty ribbon and voila! PUMPKIN!
I tied little knots in my excess sting, but you can always curl them too by saturating them in Elmer's glue and wrapping them around a pencil till they dry...I was too impatient for that!
Happy Pumpkining everyone!


No comments:
Post a Comment